Wednesday, 3 May 2017

Birdhouses

Wanda and I have been busy making birdhouses.  Lots of fun!

We're building our stock for this weekends Spring Edition market in Fort St John.


This big one has an old cedar shingle for the front and pieces of cedar shingle on the roof.  There's a fungi over the front door ~ like a little porch roof.  A piece of driftwood and a pine cone give the residents somewhere to perch. 

$65

 Love the texture of these old boards.  We made several birdhouses with the few planks we had. The fungi 'porch roof' just adds to the rustic, natural feel of these bird houses.  For the perch we've used either a piece of driftwood or an old, rusty hook.  Cute!

$35


 We also made a couple of birdhouses out of blue pallet wood.  We managed to get our hands on some old licence plates to use for the roofs and we've attached an old door handle as a perch beneath the front door.  Only two of these. Fun!

$40


Sunday, 27 November 2016

SNOW, JOY & more

We are busy painting and sanding and decorating new pieces for this weekend's Peace Country Craftsman's Association Christmas show at the Charlie Lake hall.  Hope to see you there. December 2nd, 3rd and 4th.

 SNOW on reclaimed pallet boards. Blue battery operated LED lights and silver snowflakes make this piece shine. $50
 JOY on an old barn board. Red battery operated LED lights and a bowtie for our snowman 'o' make this a fun piece for your mantle. $50
 SNOW and NOEL for either side of your front door to greet your guests. The lights are all battery operated LED lights so no cords to trip over. $50 each or $100 for the pair.
 This set is fun with the red and white lettering. Unique pine cones are tucked into the greenery on top. $55 each or  $110 for the pair.
WISH for a little princesses bedroom. So pretty in pink. $50

Monday, 7 November 2016

Dandelion WISH

These pink boards came out of the kids' fort when Rick pulled it down this summer. The boys and their dad built the fort 15 years ago and they had a great time in it till Breanna painted it pink and purple. For the last 5 years it was the girls sleepover, karaoke, hang-out fort. Now it's a pile a colourful boards in our backyard.

I sanded much of the pink off, drew on a dandelion losing it's stamens and painted WISH across the bottom.  I'm taking this to the Farmers Market this weekend. Hopefully someone will love it and give it a good home.


Sunday, 6 November 2016

Snow and Noel

Love how these turned out. We painted snowman faces in place of the 'O's.  Green jute bow ties with a jingle bell hanging from the center adorn the face.

Greenery and pine cones are attached across the top.

$110 for the pair.


These pieces look just as cute in the daylight as they do at night with the battery operated LED lights glowing.

Wednesday, 2 November 2016

Rustic birdhouses

Only 2 birdhouses left. Wanda found this well-aged boards on one of her rambles.  She packed it out of the Bush and we made 10 funky birdhouses out of it. These two below are all that remain. Awesome Christmas gift for the gardener on your list $85 each.


Saturday, 8 August 2015

rustic christmas stars

Last Christmas a friend and I spent a day putting these stars together and staining them, We spent a second day decorating with ribbon and bells and other Christmas ephemera.

The star below was designed by my daughter for her Grandma.  I love the red berries!


Most of these stars had homes in mind, but I have a couple left. This star has a pretty printed ribbon, 3 gold jingle bells and some greenery attached.

The pine cone is dipped in gold glitter


I've used a natural burlap on this star, with the edges fringed. Christmas coloured jingle bells, some greenery and a little bird decorate the front of the bow.

These birds are very cute and realistic looking.

These stars are over 2' in diameter.  They make a great door decoration in place of a wreath at Christmas.

Sunday, 2 August 2015

Concrete leaves

My girlfriends and I got together a few weekends ago and, with Rick's help mixing batches of concrete, we made these gorgeous concrete leaves. The rhubarb leaves are huge and the finished product is HEAVY, but so beautiful.

The leaves ended up drying in the garage for two weeks while we vacationed in Scotland.  Rick took the pressure washer to them to get all the dried leaf off the concrete. Love how all the veins are so clearly defined. This one is a hollyhock I think. 


We painted the leaves black with acrylic paint and then used Perfect Pearls to add the shimmery colour.  They were finished off with a couple coats of sealant so we can leave them outside.  The rhubarb leaf I did 3 years ago was starting to show the black acrylic paint through the Perfect Pearls so I added some more colour and a couple more coats of sealant.


The three leaves below are from a weed growing in the back corner of our yard.  Someone told me it was horseradish.  The leaves get longer and skinnier as the summer goes on. I'm hoping to make some more of these leaves in late August, early September when my friends from down South make a visit to Fort St John.

 
My garden is going to be full of concrete leaves if I have my way.  I might even make a few for gifts...


Tuesday, 24 June 2014

Relax


Here we are relaxing in the heat of Playa del Carmen. The kids' patio had a hammock ~ perfect for afternoon siestas in the heat.  Our mini patio had just enough space for a cute little table and a couple of chairs, to sit and read with a glass of wine in the cool of the evening.
 

Tuesday, 20 May 2014

Adventures in Mexico

A few Mexican vacation layouts.  I've been playing with texture pastes, paints and inks so when I saw Scrap the Boys latest challenge for May I thought I'd play along.  The challenge is to go grungy.  My last layout below is grungier than ever.
 
I started off with plain green cardstock and using my 12 x 12 leaf mask I sprayed green mist over all. Then I smeared bronze paint down my page.  I stamped random dragonflies using the bronze paint, white ink and black ink, then sprinkled black glitter and sprayed some coffee coloured ink mist.
 
 
This is Daniel zip lining through the jungle.
 
The papers on these pages are mostly Simple Stories from the Urban Traveler line.

Daniel rappelling down a cliff face into the kayak below.


Duncan's turn to rappel down the cliff.  He loved it!

Monday, 21 April 2014

Scrap Around the World

We came home with hundreds of photos from our 8 days in the sun.  I've spent the last three weeks organizing photos, planning layouts and journaling. My goal now is to complete a layout every day or two till I have my vacation album finished. 

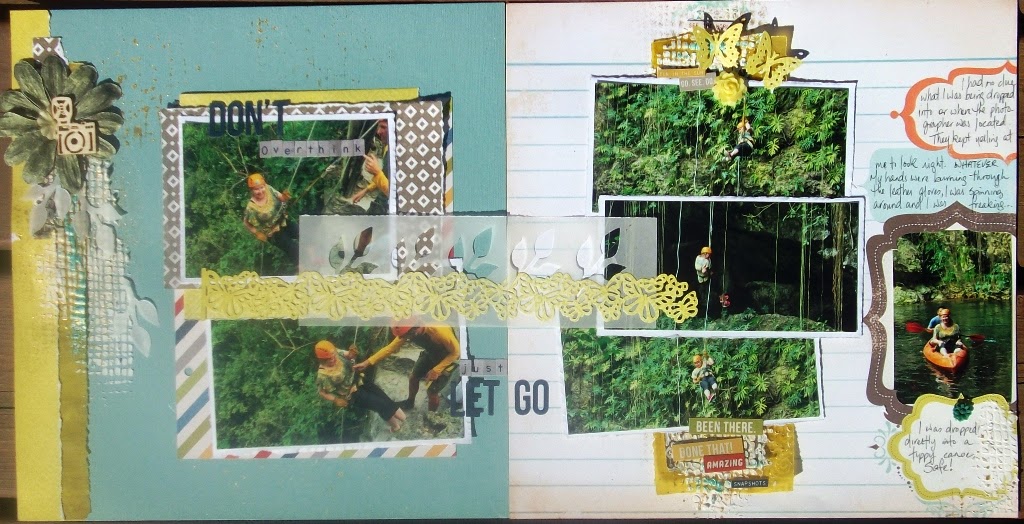
The first group of photos I scrapped are of my rappelling for my first time.  I wasn't nervous watching my family go over the edge, or even while I got geared up, but when I had to fall back over the edge the fear set in.  I wouldn't call it fun and probably wouldn't do it again. 


Scrap Around the World is a South African challenge site I check out now and again.  This is my first time playing.  I was inspired by the quote "don't overthink, just let go" (minus the 'it'). I used it for my title.  I also love the turquoise colour, butterflies(who'd of guessed) and the texture.


Friday, 28 February 2014

Prima sketch

I used Prima's February sketch for this layout. And Prima papers, rub-ons, felt alpha, stamps, rose mask, flower and leaves, and even a piece of Prima packaging.   
 

Love using up my stash!
 
Check out all the great layouts on the Prima blog!

Thursday, 13 February 2014

Purple

I played along at White with 1 this month.  The challenge was white with grape.  Photos changed my colours somewhat; this is a very purple layout.


Monday, 27 January 2014

Scrap Friends colour challenge ~ BE MERRY

I had the perfect photo for the Scrap Friends colour challenge this month. The photo is of Butchart Gardens last winter.  We always visit their 12 Days of Christmas display at night when the coloured lights are glowing magically. 

Here is the Colour Challenge. Gorgeous pinks, grey and yellow.
 I used my number stencil and white texture paste.  Then I painted it with pink Maya Roads glimmer mist.  I swiped yellow Making Memories paint across my background and splashed droplets of darker pink Glimmer Mist.  I got pretty messy with it.
 
I added random pieces of text Washi Tape, lots of bling and some black rub-ons from my stash.
 

The title is underlined with a couple of 6" bling strips.  Unforgettable Memories has all different colours of these bling strips. Very pretty!

 The yellow and pinky/purple paper strips are plain glossy paper I've covered with alcohol inks. The stickers are from the Echo Park sticker sheet I used on my last layout.  It was still on my desk and some of the designs were grey and black which worked with my colour scheme.

Monday, 18 November 2013

3 kids ROAR

My scarey little Halloween monsters.  The photos are from 1999.

This layout is for the Scrapfriends challenge. It's a colour challenge ~ yellow and shades of black/grey. Check out their blog to see what their DT has done with the challenge.

Drippy paint and ink along with netting and Halloween stickers embellish my layout.


Thursday, 14 November 2013

Blue Halloween

I played along at White with 1. Novembers challenge is blueberry.

Blue is not a typical Halloween colour, but I love how this page turned out. 

Saturday, 9 November 2013

Halloween sketch challenge

My kids weren't really into Halloween this year so I found some older photos.  My 18 yr-old when he was in kindergarten.  What a cutie he is.

The patterned papers are Carta Bella.  The stickers are Echo Park. I also used some paints, Glimmer mist, cheesecloth and Prima flowers (black, of course).

The layout is for sketchabilities challenge this month.

Wednesday, 30 October 2013

Kraft it Up challenge

The challenge on the Kraft It Up challenge blog is navy, orange, cream and kraft this month.

My layout is pretty photo heavy.  And for all the photos that didn't fit in my design are tucked into the Smash pocket on the right page.  I found the perfect washi tape design.  The map tape and road tape came in the same package.


I used my ray stencil again.  The shimmer makes the blue look lighter than it is in real life.

The Orange paper and banner pieces came from a Halloween paper pack.

Thursday, 24 October 2013

White with 1 challenge

Another October challenge completed. ~ White with watermelon.
I'm on a roll with challenges this month. And having fun with the mists and ink sprays.  I picked up the ray mask at Unforgettable Memories and have been eager to use it.  I added paper strips, washi tape, netting and stamping to my rays.


So check out the White with 1 blog.  See what their designers have done with the challenge and play along.